自定义Hexo与主题NexT

这里将记录关于Hexo一些东西,关于NexT主题,还有修改博客的东西都记录在这里。

Hexo的文件结构

使用hexo init初始化文件夹,并在安装好所需的依赖,其文件夹的结构:
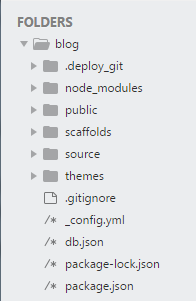
hexo_folders

  1. .deploy_git:是上传到GitHub中,如果你想添加一些额外东西的话,可以到下面的public文件夹中进行添加,然后在使用hexo d -g部署到GitHub中。

  2. node_modules:是Hexo运行时需要的一些依赖文件。

  3. public:和.deploy_git一样,生成的静态文件,只不过不用上传而已

  4. scaffolds:是一些模板文件,可以预先定义一些博文的模板,通用的格式

  5. source:我们编辑的md文件生成对应的静态文件就在这里,还有生成的一些分类文件夹也在这里。

  6. themes:存放主题文件的地方。

  7. .gitigonre:过滤上传的文件

  8. _config.yml:站点配置文件

  9. db.json:Hexo生成的缓存文件

  10. package-lock.jsonpackage.json:类型Maven项目的pom.xml,目的是记录当前项目安装哪些依赖。

站点配置文件:_config.yml

网站设置

文件地址:博客/_confg.yml
1
2
3
4
5
6
title: 网站标题
subtitle: 网站副标题
description: 网站描述,这里的作用是便于搜索引擎找到你的博客
author: 作者
language: 网站使用的语言
timezone: 时区,默认是电脑使用的时区

网址

站点配置:site/_confg.yml
1
2
3
4
url: 网址
root: 网站根目录,默认为: /
permalink: 文章的永久链接格式,默认为: :year/:month/:day/:title/
permalink_defaults: 永久链接中各部分的默认值

注:若是把博客网站放在子目录中,比如:http://yoursite.com/blog,则需要将root改为/blog/

​ 按照默认的生成规则,文字链接的格式是 时间 +文章名 这样的形式。如果你的文章名是中文的话,就会造成一定程度上面的困扰,也不利于SEO

​ 所以可以借助hexo-abbrlink,修改生成规则,减少链接的层级。 但是对hexo-asset-image有影响,需要在文章头部修改abbrlink。安装命令如下:

1
$ npm install hexo-abbrlink --save

之后修改站点配置文件:

站点配置:site/_confg.yml
1
2
3
4
permalink: post/:abbrlink.html 
abbrlink:
alg: crc32 # 算法
rep: dec # 进制

重新部署后,文章的abbrlink由算法生成,如下形式的:

1
2
http://localhost:4000/post/17e96663.html

同时,也可以直接修改abbrlink的值,直接自定义

1
2
- abbrlink: '17e96663`
+ abbrlink: 'Hello-World`
hexo-asset-image& 图片

关于hexo-asset-image,原本引用图片的命令是:

1
2
![代替文字](图片名.jpg)
![代替文字](./md文件名/图片)

使用hexo-abbrlink插件,可以自定义abbrlink的值,来简化引入图片

如果你对这个插件比较感兴趣,可以去看下hexo-abbrlink的官网


改造Hexo博客todoList1

个性化自己的博客,注:当前使用的主题是NexT,所以是针对NexT

NexT 仓库地址 https://github.com/theme-next

核心配置

override

1
2
3
# 用于更新 NexT 项目
- override: false
+ override: true

网站信息设置

favicon - 站点图标

先选好一张图片,然后到这里生成相应的图片,然后把图片放在主题的资源文件夹/themes/next/source/images/下面,我新建了一个favicon文件夹用来存放站点图标

文件位置:theme/next/_config.yml
1
2
3
4
5
6
7
favicon:
small: /images/favicon/favicon-16x16-next.png
medium: /images/favicon/favicon-32x32-next.png
apple_touch_icon: /images/apple-touch-icon-next.png
safari_pinned_tab: /images/logo.svg
#android_manifest: /images/manifest.json
#ms_browserconfig: /images/browserconfig.xml

keywords - 默认关键词

1
2
# Set default keywords (Use a comma to separate)
keywords: "Something Good"

rss - 订阅设置

无修改

1
2
3
4
5
6
7
8
9
10
11
12
13
14
15
16
17
18
19
20
footer:
+ # 建站年份
+ since: 2018
+ # 年份后面的图标,为 Font Awesome 图标
+ # https://fontawesome.com/v4.7.0/icons/
+ icon: rocket
+ # 作者
+ copyright:
# 是否展示Hexo的地址
powered: true

# 是否展示使用Hexo的主题
theme:
# Theme & scheme info link (Theme - NexT.scheme).
enable: true
# Version info of NexT after scheme info (vX.X.X).
version: true

# 自定义文本
#custom_text: 'Hello'

SEO 设置

无修改

菜单设置

1
2
3
4
5
6
7
8
9
menu:
home: / || home
about: /about/ || vcard
tags: /tags/ || tags
archives: /archives/ || calculator

+ # 开启图标
menu_icons:
enable: true

主题方案选择

1
2
3
4
5
# Schemes
#scheme: Muse
#scheme: Mist
+ scheme: Pisces
#scheme: Gemini

侧边栏设置

1
2
3
4
5
6
7
8
9
10
11
12
13
14
15
16
17
18
19
20
+ # 社交链接
+ social:
+ GitHub: https://github.com/yourname || github

# Blog rolls
+ # 侧栏友链设置
+ links_icon: globe
+ links_title: 神奇的链接
+ #links_layout: block
+ links_layout: inline
+ links:
+ UserA: xxxx
+ UserB: ssss

# 侧边栏头像设置
# Sidebar Avatar
# in theme directory(source/images): /images/avatar.gif
# in site directory(source/uploads): /uploads/avatar.gif
# 将头像放在blog/source/uploads中(新建uploads)
+ avatar: /uploads/logo.jpg

emoji表情(有问题)

先安装hexo-filter-github-emojis

1
npm install hexo-filter-github-emojis --save

安装完成后,修改站点配置文件

文件位置:~/blog/_config.yml
1
2
3
4
5
6
7
+ # emoji表情支持
+ githubEmojis:
+ enable: true
+ idName: github-emoji
+ unicode: false
+ styles:
+ localEmojis:

接着我们要修改下这个插件,这里和reuixiy就不同了

文件位置:~/blog/node_modules/hexo-filter-github-emojis/index.js
1
2
3
4
5
6
7
8
9
10
11
12
if (options.inject) {
$('body').append(`<script>
- document.querySelectorAll('.${options.className}')
+ document.querySelectorAll('#${options.className}')
.forEach(el => {...});
</script>`)
}
.
.
.
- return `<span class="${options.className}" style="${styles.join(';')}" data-src="${emojis[name].src}">${codepoints}</span>`
+ return `<span id="${options.className}" style="${styles.join(';')}" data-src="${emojis[name].src}">${codepoints}</span>`

最后补点东西

1
2
3
4
5
6
7
8
9
10
11
12
13
14
15
16
17
18
19
20
21
22
23
24
25
26
27
28
29
30
31
32
33
34
35
36
37
38
39
40
41
42
43
44
45
46
47
48
49
50
// 自定义emoji样式
img#github-emoji {
margin: 0px;
padding: 0px;
display: inline !important;
vertical-align: text-bottom;
border: none;
cursor: text;
box-shadow: none;
}
// 文章超链接样式(为emoji特设)
.post-body a {
border-bottom: none;
text-decoration: underline;
}
.post-body a:hover {
border-bottom: none;
text-decoration: underline;
}
// 标签云页面超链接样式(为emoji特设)
.tag-cloud a {
border-bottom: 1px solid rgb(80, 115, 184);
text-decoration: none;
}
.tag-cloud a:hover {
border-bottom: 1px solid rgb(161, 102, 171);
text-decoration: none;
}
// 文章元数据中categories的样式(为emoji特设)
a.categories {
border-bottom: none;
text-decoration: underline;
}
a.categories:hover {
border-bottom: none;
text-decoration: underline;
}
// tabs标签(为emoji特设)
.post-body .tabs ul.nav-tabs li.tab a {
text-decoration: none;
}
// 图片下方标题设置(为emoji特设)
a.fancybox{
text-decoration: none !important;
}
// 按钮样式(为emoji特设)
.btn {
text-decoration: none !important;
border: 2px solid #222 !important;
}

然后直接去 Emoji Cheat Sheet 点一下自己想要的表情复制,再粘贴到自己的文章中即可😝😎🐾

背景图片

我们需要用到jquery-backstretch,然后修改如下文件:

文件位置:/themes/next/layout/_layout.swig
1
2
3
4
5
+  <script src="https://cdnjs.cloudflare.com/ajax/libs/jquery-backstretch/2.0.4/jquery.backstretch.min.js"></script>
+ <script>
+ $("body").backstretch("https://背景图.jpg");
+ </script>
</body>

当然还有另外的方法:

文件位置:/theme/next/source/css/_custom/custom.styl
1
2
3
4
5
6
7
8
9
10
11
12
13
14
// 站点背景
@media screen and (min-width:1200px) {

body {
background-image:url(/images/图片);
background-attachment:fixed;
background-position:50% 50%;
opacity: 0.97;
}

#footer a {
color:#eee;
}
}

文章注脚

安装hexo-footnotes2

执行位置:~/blog
1
npm install hexo-footnotes --save

使用的方法:

1
2
3
4
5
6
7
8
9
10
basic footnote1
here is an inline footnote[^2](inline footnote)
and another one3
and another one4

[^1]: basic footnote content
[^3]: paragraph
footnote
content
[^4]: footnote content with some [markdown](https://en.wikipedia.org/wiki/Markdown)

引用

用法:

1
2
3
4
5
6
{% cq %}
人生乃是一面镜子,
从镜子里认识自己,
我要称之为头等大事,
也只是我们追求的目的!
{% endcq %}

效果:

人生乃是一面镜子,
从镜子里认识自己,
我要称之为头等大事,
也只是我们追求的目的!

note 标签

现在主题中启动note标签

文件位置:~/blog/themes/next/_config.yml
1
2
3
4
5
6
7
8
9
# Note tag (bs-callout).
note:
# 风格
style: flat
# 要不要图标
icons: true
# 圆角矩形
border_radius: 3
light_bg_offset:

default

1
<div class="note default"><p>default</p></div>

其他还有primary,success,info,warning,danger,若不想要带有图标可以用no-icon

参考资料

- the End -
0%